Observe the operating instructions of the receiver and the safety instructions for all devices you connect. Only use the ICARUS blue system in accordance with its technical specifications and leave the connection to qualified electricians.
Switch off the power supply.
Connect the black wire of the receiver cable to ground (0 Vdc).
Connect the gray wires of the receiver cable to the respective device / component that you want to control. See the overview table of wire assignments.
Make sure that the connected device / component is connected to the same ground as the receiver.
Connect the red wire of the receiver cable to the power supply (9 - 36 Vdc).
Observe the operating instructions of the receiver and the safety instructions for all devices you connect. Only use the ICARUS blue system in accordance with its technical specifications and leave the connection to qualified electricians.
Plug the supplied cable into the receiver. Note: Only use the supplied cable and connector!
Connect black wire to ground (0 Vdc).
Connect green, yellow, gray and/or violet wires to the corresponding devices/components.
Connect the red wire to the power supply (9–36 Vdc).
Check the connections and switch on the power supply. The LED on the receiver flashes green, signaling a successful start.
Connect & switch on receiver → Status LED flashes green
Press the button on the receiver 3x quickly → LED flashes red/green
Bei ausgeschaltetem Sender Taste 1 gedrückt halten (<3 Sek.) bis Status – LED leuchtet. Taste 1 loslassen und anschließend 2x schnell drücken.
Pairing successful: Transmitter LED blue, receiver LED green
Special feature of the 2XR version: Select the button on which the receiver is to be saved by pressing the left or right function button (B5/B6). Repeat the pairing process and press the other function button to save the second receiver.
Press button 1 on the transmitter to switch it off and end the pairing mode
Transmitter automatically connects the next time it is switched on
Special feature of the 2XR version: After switching on, you must select which of the two paired receivers the hand-held transmitter should connect to by pressing one of the two function keys (B5/B6).
Connect and set up the app
Download app
Loose the cable gland and remove the protective cap (see also operating instructions on page 13)
Open app
Supply receiver with voltage
Follow the steps described in the video
How the transmitter works
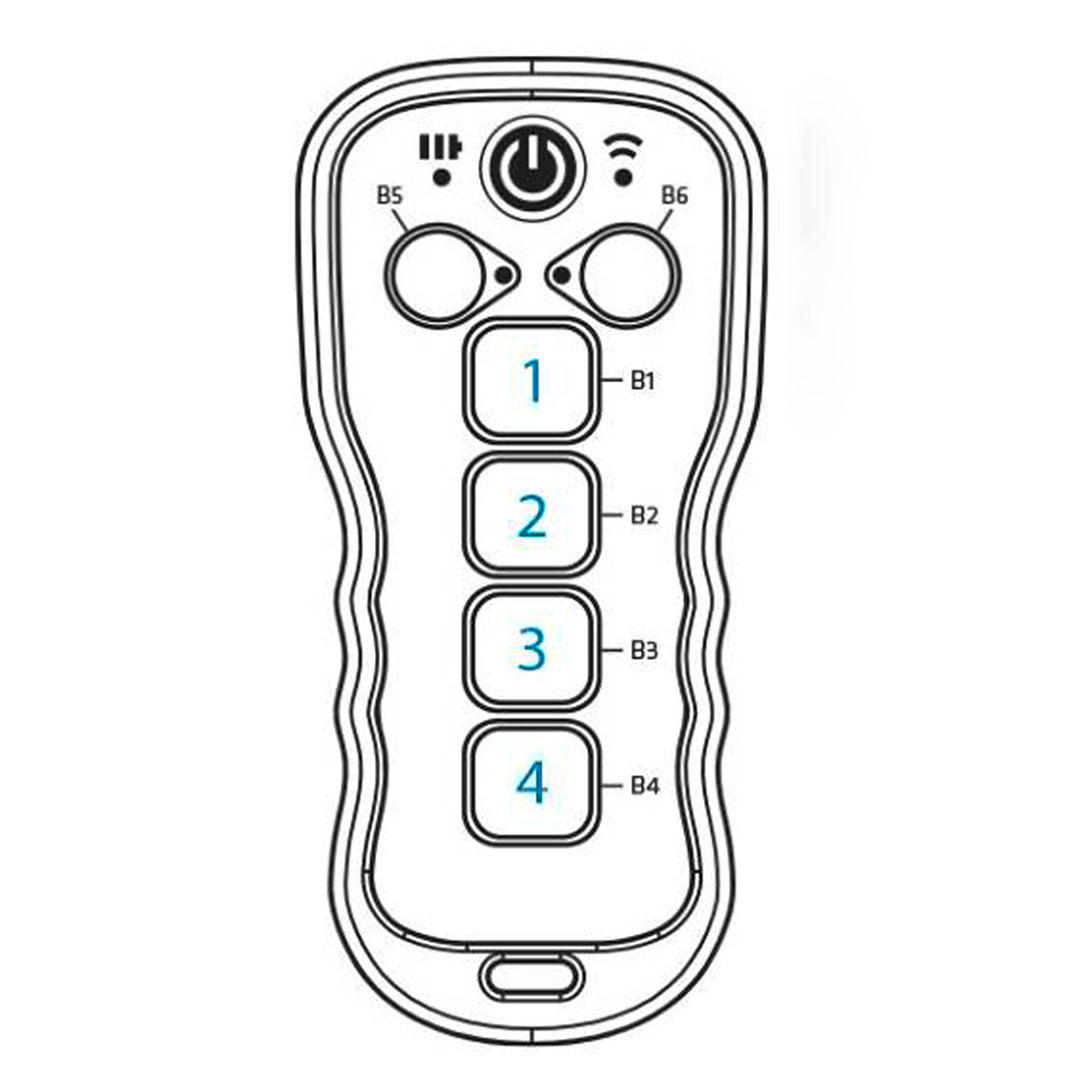
You have the R420 receiver? Then your TM600 handheld transmitter behaves as follows:
The TM600 hand-held transmitter is already paired with the receiver upon delivery.
Use buttons B1 - B4 to control outputs 1 - 4 of the receiver.
Buttons B5 and B6 have no function unless you activate buttons 5 and 6 in the app and assign outputs to them.
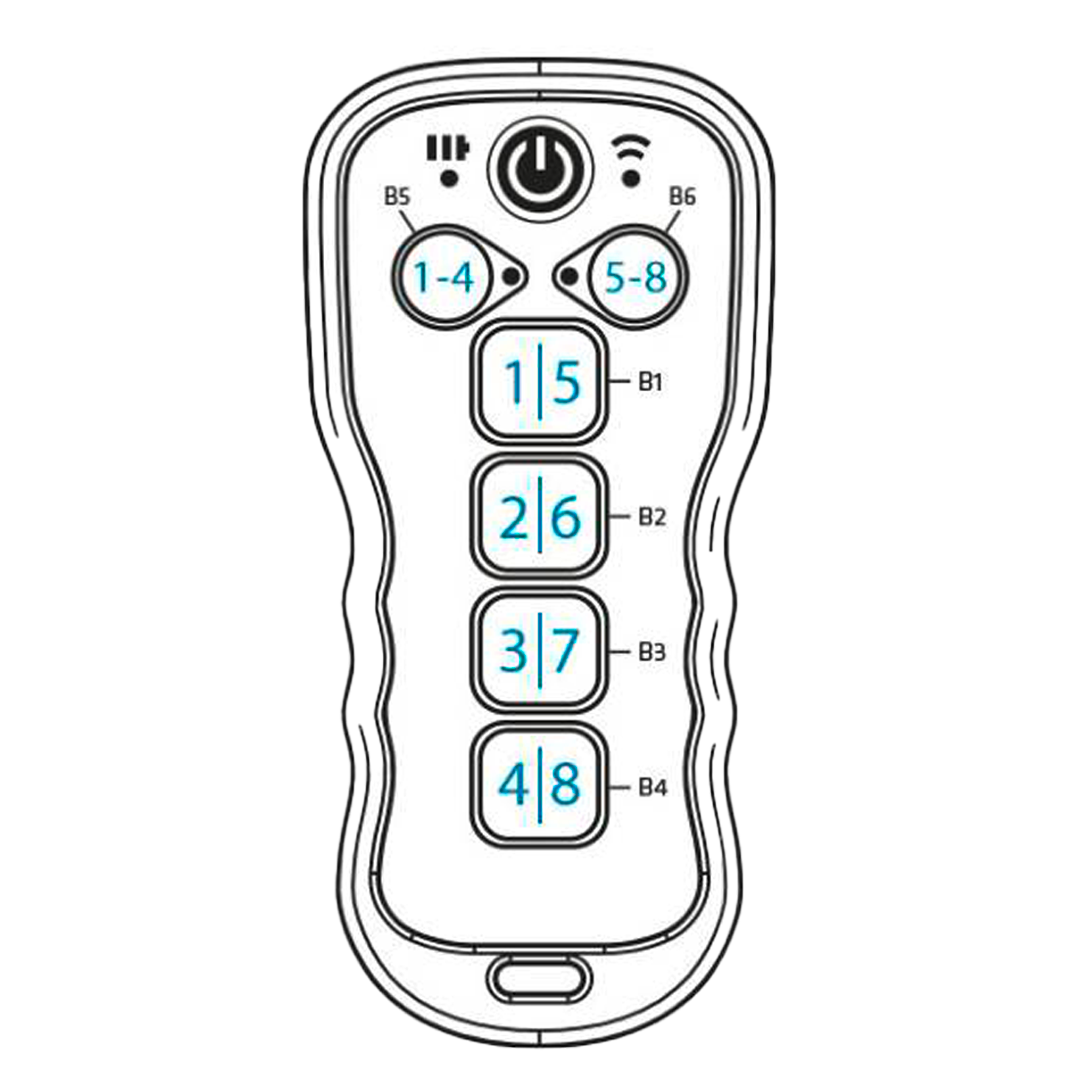
You have the R820 receiver? Then your TM600 handheld transmitter behaves as follows:
The TM600 hand-held transmitter is already paired with the receiver upon delivery.
You can use the B5 + B6 buttons to switch back and forth between two function blocks (FB). You can see which function block is currently active by which of the two middle status LEDs lights up blue.
Once you have selected function block 1 (left status LED lights up blue), use buttons B1 to B4 to control outputs 1 to 4 of the receiver.
If function block 2 (right-hand status LED lights up blue) is active, use buttons B1 to B4 to control outputs 5 - 8 of the receiver.
We, the ICP Group, are the company behind ICARUS blue. We have been developing customized electronic control solutions for commercial, recreational and agricultural vehicles since 2003.
Do you have questions that have not been answered on this page? Or do you simply need personal support with the installation and setup of your sample? Our German sales team at ICP GmbH will be happy to help you:
See ICARUS blue in action! This time our customer “Jansen Hydrauliek Service bv” from Dongen (Netherlands) sent us this short video of a useful application for the ICARUS blue!Car tipper trailer (EN)
See ICARUS blue in action! This video shows you how quick and easy it is to install, connect and set up ICARUS blue to control your tipper trailer via smartphone.Dump truck (EN)
Video example of controlling a tipper truck via the ICARUS blue smartphone app.Boat gangway (EN)
From small to large applications – with the ICARUS blue you have everything under control. In this video we show how one of our customers controls the gangway of his yacht comfortably, reliably and safely via smartphone.
First steps
Pair smartphone (EN)
Did you know that you can easily control and configure the receivers of the ICARUS blue R-series with a free smartphone app? In today's step-by-step instructions, we will show you how easy it is to pair your smartphone with a receiver.Pair hand-held transmitter (EN)
The ICARUS blue R-series is designed to be simple, fast, and user-friendly. This also applies to pairing the transmitter and receiver. Learn more about the process in our step-by-step video tutorial.Connect with paired receiver (EN)
Connect the app to already paired receivers with just a few clicks! In this step-by-step guide, we'll walk you through the quick and easy process of (re)connecting to a paired receiver.Rename receiver (EN)
Would you like to give your paired receivers a unique name in the app? In this step-by-step guide, we'll show you how easy it is to rename your previously paired receivers using the intuitive settings on your device.Disconnect from receiver (EN)
In this step-by-step guide, we'll show you how to easily disconnect your app from an ICARUS blue receiver.Unpair receiver (EN)
Would you like to cancel the pairing between your smartphone and the receiver? In this step-by-step guide, we'll show you how to effortlessly unpair a receiver.
Configure buttons
Convert button to switch (EN)
Did you know that you can turn a button into a switch and vice versa with a simple setting? In this step-by-step guide, we'll walk you through the simple process.Assign outputs to buttons (EN)
Did you know that you can assign one or more outputs to a button with just a few taps? In this step-by-step guide, we'll show you how to quickly set up your button assignments for enhanced control.Change button symbol (EN)
Did you know that you can effortlessly change a button icon on your device with a simple setting? In this step-by-step guide, we'll show you how to easily customize your button icons.Hide button (EN)
Did you know that for each button in the app, you can individually specify whether it should be displayed to the user or not? In this step-by-step guide, we'll show you how to quickly hide a button and better customize your device's user interface to suit your needs.Lock buttons (EN)
Would you like to prevent multiple buttons from being pressed simultaneously? Then use the lock setting! In this step-by-step guide, we will show you how to set the lock individually for each button.
Configure outputs
Configure turn-on delay (EN)
Did you know that you can easily set a delay for switching on a receiver output? In this step-by-step guide, we'll walk you through the simple process of configuring this delay to adjust the timing of when your output is switched on.Configure turn-off delay (EN)
Did you know that you can activate a delay for switching off a receiver output? In this step-by-step guide, we'll walk you through the process of configuring this delay to set how long your output remains active before it is switched off.Deactivate turn-on delay (EN)
Have you set an 'power-on delay' in your receiver configuration and want to deactivate it again? In this step-by-step guide, we'll walk you through the simple process of deactivating the power-on delay to ensure your output responds immediately.Deactivate turn-off delay (EN)
Have you set an 'output switch-off delay' in your receiver configuration and want to deactivate it again? In this step-by-step guide, we'll walk you through the process of deactivating this delay to adjust your output settings as needed.
General settings
Activate live voltage display (EN)
Did you know that you can display the voltage applied to the receiver live in the app? In this step-by-step tutorial, we’ll guide you through the simple process of turning on this feature to monitor your voltage levels in real-time.Set undervoltage warning (EN)
Did you know that you can quickly set up an undervoltage warning in the app to monitor the status of the voltage applied to the receiver? In this step-by-step guide, we'll walk you through the simple process of setting up this warning to alert you to an undervoltage condition.Deactivate live voltage display (EN)
Did you know that you can quickly deactivate the live voltage display in the app? In this step-by-step guide, we'll walk you through the simple steps to disable this feature.Change app language (EN)
Did you know that you can change the language of the app at any time? In this step-by-step guide, we'll walk you through the simple process of changing the app language.Protect settings with password (EN)
Did you know that you can protect your receiver settings with a password to ensure their security? In today's step-by-step guide, we'll show you how to set up a password to protect your receiver's configurations.Reset to factory settings (EN)
Did you know that you can reset your receiver to the factory settings in just a few steps? In this step-by-step guide, we'll show you how to easily reset your receiver to its original configuration.
Classic App
Activate pairing mode (EN)
In our "How to" videos, you will learn everything about the basics of setting up and using the ICARUS blue Receiver, as well as helpful tips for setting up the ICARUS blue App.Add new receiver (EN)
In our "How to" videos, you will learn everything about the basics of setting up and using the ICARUS blue Receiver, as well as helpful tips for setting up the ICARUS blue App.Switch between receivers (EN)
In our "How to" videos, you will learn everything about the basics of setting up and using the ICARUS blue Receiver, as well as helpful tips for setting up the ICARUS blue App.Change button icon (EN)
In our "How to" videos, you will learn everything about the basics of setting up and using the ICARUS blue Receiver, as well as helpful tips for setting up the ICARUS blue App.Configure basic settings (EN)
In our "How to" videos, you will learn everything about the basics of setting up and using the ICARUS blue Receiver, as well as helpful tips for setting up the ICARUS blue App.
Manage cookie consent
We use technologies such as cookies to store and/or access device information. We do this to improve the browsing experience and to display (non-)personalized advertising. If you consent to these technologies, we may process data such as browsing behavior or unique IDs on this website. If you do not give your consent or withdraw your consent, certain functions may be impaired.
Functional
Always active
The technical storage or access is strictly necessary for the legitimate purpose of enabling the use of a specific service explicitly requested by the subscriber or user, or for the sole purpose of carrying out the transmission of a communication over an electronic communications network.
Preferences
The technical storage or access is necessary for the legitimate purpose of storing preferences that are not requested by the subscriber or user.
Statistics
The technical storage or access that is used exclusively for statistical purposes.The technical storage or access that is used exclusively for anonymous statistical purposes. Without a subpoena, the voluntary consent of your Internet service provider, or additional records from third parties, information stored or retrieved for this purpose alone cannot usually be used to identify you.
Marketing
The technical storage or access is required to create user profiles to send advertising or to track the user on a website or across multiple websites for similar marketing purposes.